Monday, 31 December 2012
Most of standard keyboards come with a small numeric keypad which identified by the numbers from 0 to 9. However, this numeric keypad is also served for some other functions such as "Page Up", "Page Down", "End", "Home", etc... depending on which mode of the "Num Lock" is being used.
 Many Windows users find this numeric keypad useful to type the numbers faster. But oopps... after hitting a several keys on the numeric keypad, you recognize the outcomes are not what you expected. Then you recognize the "Num Lock" mode is "OFF", so you just need to switch it on, and... start over your typing! The bad news is, by default, Windows turns the Num Lock off; however, the good news is, you can configure Windows to turn this Num Lock ON so that whenever you mean "number", you really get a number.
Follow the steps:
Open the "Registry Editor" ("Start" >> "Run", then type "regedit" and Enter).
Follow the steps:
Open the "Registry Editor" ("Start" >> "Run", then type "regedit" and Enter).
- Expand to the following key:
HKEY_CURRENT_USER\Control Panel\Keyboard\ - Within the keyboard folder, you should have a string value named "InitialKeyboardIndicators" with a value of 0, 1, or 2.
- Double-click on this string value "InitialKeyboardIndicators" and edit the value to what you want. Below is the explaination of the values:
0: Num Lock is turned OFF on startup
1: Disable Num Lock
2: Num Lock is turned ON on startup
Monday, 31 December 2012 0
Monday, 29 October 2012
Skipscreen is an extension to browser to by pass waiting time on download. Unfortunately it can only be used with Firefox browsers to avoid waiting time while downloading files from some popular File hosting services like:

* Rapidshare.com
* zShare.net
* MediaFire.com
* Megaupload.com
* Sharebee.com
* Depositfiles.com
* Sendspace.com
* Divshare.com
* Linkbucks.com
* Uploaded.to
* Hotfiles.com
* 4shared.com
* Limelinx.com
* Link-Protector.com
Its use is very simple and does not require any configuration, just go to the addon page of the extension and install it, restart your browser and enter one of thesedownload sites and you will no longer have to wait.
Download SkipScreen Add-On
Monday, 29 October 2012 0
Saturday, 6 October 2012
ASSOC==>Displays or modifies file extension associations.

AT==>Schedules commands and programs to run on a computer.
ATTRIB==>Displays or changes file attributes.
BREAK==>Sets or clears extended CTRL+C checking.
CACLS==>Displays or modifies access control lists (ACLs) of files.
CALL==>Calls one batch program from another.
CD==>Displays the name of or changes the current directory.
CHCP==>Displays or sets the active code page number.
CHDIR==>Displays the name of or changes the current directory.
CHKDSK==>Checks a disk and displays a status report.
CHKNTFS==>Displays or modifies the checking of disk at boot time.
CLS==>Clears the screen.
CMD==>Starts a new instance of the Windows command interpreter.
COLOR==>Sets the default console foreground and background colors.
COMP==>Compares the contents of two files or sets of files.
COMPACT==>Displays or alters the compression of files on NTFS partitions.
CONVERT==>Converts FAT volumes to NTFS. You cannot convert the current drive.
COPY==>Copies one or more files to another location.
DATE==>Displays or sets the date.
DEL==>Deletes one or more files.
DIR==>Displays a list of files and subdirectories in a directory.
DISKCOMP==>Compares the contents of two floppy disks.
DISKCOPY==>Copies the contents of one floppy disk to another.
DOSKEY==>Edits command lines, recalls Windows commands, and creates macros. ECHO==>Displays messages, or turns command echoing on or off.
ENDLOCAL==>Ends localization of environment changes in a batch file.
ERASE==>Deletes one or more files.
EXIT==>Quits the CMD.EXE program (command interpreter).
FC==>Compares two files or sets of files, and displays the differences between them.FIND==>Searches for a text string in a file or files.
FINDSTR==>Searches for strings in files.
FOR==>Runs a specified command for each file in a set of files.
FORMAT==>Formats a disk for use with Windows.
FTYPE==>Displays or modifies file types used in file extension associations.
GOTO==>Directs the Windows command interpreter to a labeled line in a batch program.
GRAFTABL==>Enables Windows to display an extended character set in graphics mode.
HELP==>Provides Help information for Windows commands.
IF==>Performs conditional processing in batch programs.
LABEL==>Creates, changes, or deletes the volume label of a disk.
MD==>Creates a directory.
MKDIR==>Creates a directory.
MODE==>Configures a system device.
MORE==>Displays output one screen at a time.
MOVE==>Moves one or more files from one directory to another directory.
PATH==>Displays or sets a search path for executable files.
PAUSE==>Suspends processing of a batch file and displays a message.
POPD==>Restores the previous value of the current directory saved by PUSHD.PRINT==>Prints a text file.
PROMPT==>Changes the Windows command prompt.
PUSHD==>Saves the current directory then changes it.
RD==>Removes a directory.
RECOVER==>Recovers readable information from a bad or defective disk.
REM==>Records comments (remarks) in batch files or CONFIG.SYS.
REN==>Renames a file or files.
RENAME==>Renames a file or files.
REPLACE==>Replaces files.
RMDIR==>Removes a directory.
SET==>Displays, sets, or removes Windows environment variables.
SETLOCAL==>Begins localization of environment changes in a batch file.
SHIFT==>Shifts the position of replaceable parameters in batch files.
SORT==>Sorts input.
START==>Starts a separate window to run a specified program or command.
SUBST==>Associates a path with a drive letter.
TIME==>Displays or sets the system time.
TITLE==>Sets the window title for a CMD.EXE session.
TREE==>Graphically displays the directory structure of a drive or path.
TYPE==>Displays the contents of a text file.
VER==>Displays the Windows version.
VERIFY==>Tells Windows whether to verify that your files are written correctly to a disk.
VOL==>Displays a disk volume label and serial number.
XCOPY==>Copies files and directory trees.
Saturday, 6 October 2012 0
Friday, 21 September 2012
First you should go
“start > run >eventvwr.msc”
Events are stored in three log files: Application, Security, and System. These logs can be reviewed and archived.
For our purposes we want the System log. Click on “System” in the left-hand column for a list of events.

“start > run >eventvwr.msc”
Events are stored in three log files: Application, Security, and System. These logs can be reviewed and archived.
For our purposes we want the System log. Click on “System” in the left-hand column for a list of events.

Look for a date and time when you weren’t home and your computer should have been off.
Double click on the eg: info and it will show u the detail.
You can also use this log to see how long someone was on the computer. Just look at the time the computer was turned on and off for that day.
Hope u all will like it.@Crusader :)
Double click on the eg: info and it will show u the detail.
You can also use this log to see how long someone was on the computer. Just look at the time the computer was turned on and off for that day.
Hope u all will like it.@Crusader :)
Friday, 21 September 2012 0
Wednesday, 19 September 2012
By this trick you can show your processor as pentium i7 or What ever u like
GO TO START>RUN>TYPE REGEDIT>HKEY_LOCAL_MACHINE>HARDWARE>DISCRIPTION>SYSTEM>CENTRAL
PROCESSOR>ON RIGHT HAND SIDE RIGHT CLICK ON PROCESSOR NAME AND STRING AND THE CLICK ON
MODIFY AND WRITE WHAT EVER YOU WANT.

Hope you like it! If you like please keep visiting for more! @Crusader :)
Wednesday, 19 September 2012 0
You may have visited a lot of sites which have disabled right click in it… it’s really, really annoying.
 Like orkut has disabled clicking right click on album view foler, so that you can not save photos by right clicking and selecting save as image.
So here is the tutorial which enables right click


So here is the tutorial which enables right click
For Internet Explorer users:
- Click “Tools”>”Internet Options”
- Click the “Security” tab
- Click “Custom Level”
- Scroll down to the “Scripting” section
- Set “Active Scripting” to “disable”
- Click “Ok”.

For Firefox users:
- Click “Tools”>”Options”
- Click the “Content” tab
- Uncheck “Enable Javascript” (Set “Enable Javascript” to “disable” )
- Click “Ok”.

Friday, 7 September 2012
Are you bored from every time clicking on Display Images Below and Always display images and content link clicks. Do you know How to Set Always Display Images and External Content Option in Gmail?. Gmail lets you view external images and content in the body message thanks to a couple of interesting options: Always Display Images from and Always Display External Content (such as images) Sent by Trusted Senders.


Let’s see how to turn these two useful options on and what to do when Gmail doesn’t seem willing to display external images, pictures and content despite the options above have been enabled.
How to Set Always Display Images Option in Gmail
1. Login your Gmail account.
2. On the right side of the Gmail interface, click the Settings link.
3.Under the General tab (which should be available by default as soon as you click Settings) go to the External Content section and click the Always display external content (such as images) sent by trusted senders radio button.
Now you should be able images, pictures and external content. However, in some cases turning on the above options seems not to work. Let’s see how to solve this issue:
First of all let me tell you that the issue is not due to Gmail itself but to your browser. In fact, the external content issue seems to be caused by Internet Explorer. If you have Firefox, Google Chrome, Opera browser or Safari you should be able to see external content without issues.
If you have Internet Explorer and want to fix the issue, click Tools from the upper bar and from the menu click Internet Options which should be the last link in the menu.
Now, Click the Security tab and Custom Level button.
Under the Settings list go to the Miscellaneous section – Display Mixed Content and click the Enable radio button.
Confirm your choice if asked and press OK.
Now Log out your Gmail, turn off Internet Explorer, clear its Internet cache and try to log in your Gmail again.
Done!
Friday, 7 September 2012 0
Friday, 31 August 2012
How To Restore Gmail Contacts. There are many times in life when a do-over can come in handy. Perhaps you clicked “Send” on an email that was better left unsaid, or “Delete” on a contact before realizing you still needed it. Just like Gmail lets you unsend a message, you can now have a second chance with your contacts too.

Google have added a new feature to Google Contacts that allows you to revert your contact list and undo any mistakes made up to 30 days in the past. Let’s say you accidentally deleted a bunch of contacts or wiped the contact data from your Gmail account by mistake while syncing to another device.

Google have added a new feature to Google Contacts that allows you to revert your contact list and undo any mistakes made up to 30 days in the past. Let’s say you accidentally deleted a bunch of contacts or wiped the contact data from your Gmail account by mistake while syncing to another device.
How to Restore Gmail Contacts
1) Visit Gmail’s Contacts section,
2) Select “Restore contacts” in the “More actions” menu, and choose the time you would like to revert to.
Your contacts will be restored to exactly the same state they were in at that time — any contacts that didn’t exist then will be deleted and any that have since been added will be deleted. Don’t worry, you can always undo this change by restoring again if you didn’t get the time right.
Friday, 31 August 2012 0
Gmail voice and video chat makes it easy to stay in touch with friends and family using your computer’s microphone and speakers. But until now, this required both people to be at their computers, signed into Gmail at the same time. Given that most of us don’t spend all day in front of our computers, we thought, “wouldn’t it be nice if you could call people directly on their phones?”
With the ability to call phones built right into Gmail, you no longer have to get out your phone and retype a number anytime someone send you one in an email or chat message. Starting today, you’ll see that phone numbers appear as links, like this:
Just click the number, and Gmail’s dialpad will pop up, already populated with the number you’re trying to call.

Click “Call” and voilà! Of course, if you don’t already have the voice and video plugin installed, you’ll be prompted to do that first.
You’ll also see a little green phone icon next to numbers in your contacts which you can use to do the same thing.
With the ability to call phones built right into Gmail, you no longer have to get out your phone and retype a number anytime someone send you one in an email or chat message. Starting today, you’ll see that phone numbers appear as links, like this:
Just click the number, and Gmail’s dialpad will pop up, already populated with the number you’re trying to call.
Click “Call” and voilà! Of course, if you don’t already have the voice and video plugin installed, you’ll be prompted to do that first.
You’ll also see a little green phone icon next to numbers in your contacts which you can use to do the same thing.
Google announced the introduction of Gmail Tap. People wanted some more information, so google has shared an in-depth interview with their product lead.That they are introducing new feature called Gmail Tap for the Mobile users, and that too using two characters “DOT” and “DASH”. Lets find behind the scenes update and look at Gmail Tap.


With Gmail Tap on your phone, you’ll be able to:
Tap without looking at your screen
Replace 26 keys with 2
Double your productivity by typing two emails at once
Features of Gmail Tap

Two keys: dot and dash
Space bar: added to increase typing speeds
Multi-email mode: dual threaded keyboard (Warning: power users only)
Predictive text mode: autocomplete re-imagined
Optional audio feedback: engage all your senses
Coming Soon on Gmail Tap

Ship to shore mode: activates your phone’s flash to communicate with other power users across an ocean (of people)
Table tap: microphone enabled off screen tapping
Double-black diamond mode: adds a third, fourth and more keyboards for writing up to 8 messages at once
Gmail Tap is a binary language that only uses two characters — dots and dashes, making it easy to learn:
- In a hurry to use this app on your smart phone?
- You might get “Oops! Gmail Tap is a bit too popular right now. We suggest you try downloading it again next year.” Gotcha.. April Fool!!!!!
Introducing Gmail Tap
With Gmail Tap on your phone, you’ll be able to:
Tap without looking at your screen
Replace 26 keys with 2
Double your productivity by typing two emails at once
Features of Gmail Tap
Two keys: dot and dash
Space bar: added to increase typing speeds
Multi-email mode: dual threaded keyboard (Warning: power users only)
Predictive text mode: autocomplete re-imagined
Optional audio feedback: engage all your senses
Coming Soon on Gmail Tap
Ship to shore mode: activates your phone’s flash to communicate with other power users across an ocean (of people)
Table tap: microphone enabled off screen tapping
Double-black diamond mode: adds a third, fourth and more keyboards for writing up to 8 messages at once
Gmail Tap is a binary language that only uses two characters — dots and dashes, making it easy to learn:
- In a hurry to use this app on your smart phone?
- You might get “Oops! Gmail Tap is a bit too popular right now. We suggest you try downloading it again next year.” Gotcha.. April Fool!!!!!
Video about Gmail Tap [Behind-the-Scenes]
Introducing Gmail Tap
Wednesday, 8 August 2012
Mobile Spy is the next generation of smartphone spy software. Do you suspect that your child or employee is abusing their SMS or vehicle privileges? If yes, then this software is ideal for you. Install this small program directly onto your compatible smartphone you want to monitor to begin recording.

Using the Internet capabilities of your phone, recorded activities, logs and GPS locations are quickly uploaded to your Mobile Spy account. To view the results, you simply login to your secure account at the Mobile Spy web site. Logs are displayed by categories and sorted for easy browsing.
The software is completely stealth and works independently. Mobile Spy does not rely on the phone's call and message logs to record activities. So even if the user tries to delete their tracks, the data will still be retained and uploaded. Compatible with most models of iPhone, BlackBerry or Android phones! Also compatible with Windows Mobile, Symbian OS and iPad.
Features:
Call Log: Each incoming and outgoing number is logged along with duration and time stamp.
SMS (Text Messages) Log:Every text message is logged even if the phone's logs are deleted. Includes full text.
GPS Locations Log: GPS postions are uploaded every thirty minutes with a link to a map.
Contacts: Every contact on the phone is logged. New contacts added are also recorded.
Tasks: All personal tasks that are created are logged and viewable.
Memos: Every memo input into the phone is logged and viewable.
Cell ID Locations:
ID information on all cell towers that the device enters into range of is recorded.
E-Mail Log:
All inbound & outbound email activity from the primary email account is recorded.
Calendar Events:
Every calendar event is logged. Date, time, and locations are recorded.
URL (Website) Log:
All URL website addresses visited using the phone's browser are logged.
Photo & Video Log:
All photos & videos taken by the phone are recorded & are viewable.
For more info log on to :www.mobile-spy.com
Wednesday, 8 August 2012 0
Tuesday, 7 August 2012
 You have a copy of Windows XP which several times pop up message about its activation, you don't have internet connection to activate your XP. So here's the trick that can help you get rid of this problem. Please note that this trick will only work on ordinary Windows XP SP1-SP2 installation that too before installing any other program on it i.e
your installation must be fresh to make this trick work out. Also it will not work on OEM version of Windows XP so if this trick doesn't work for you check your copy for OEM.
Method :
Open Notepad and copy following lines in it,
Windows Registry Editor Version 5.00
[HKEY_LOCAL_MACHINESOFTWAREMicrosoftWindows NTCurrentVersion]
“CurrentBuild”=”1.511.1 () (Obsolete data – do not use)”
“ProductId”=”55274-640-1011873-23081″
“DigitalProductId”=hex:a4,00,00,00,03,00,00,00,35,35,32,37,34,2d,36,34,30,2d,
31,30,31,31,38,37,33,2d,32,33,30,38,31,00,2e,00,00,00,41,32,32,2d,30,30,30,
30,31,00,00,00,00,00,00,00,86,56,4e,4c,21,1b,2b,6a,a3,78,8e,8f,98,5c,00,00,
00,00,00,00,dd,da,47,41,cc,6b,06,00,00,00,00,00,00,00,00,00,00,00,00,00,00,
00,00,00,00,00,00,00,00,00,00,00,38,31,30,32,36,00,00,00,00,00,00,00,b5,16,
00,00,83,83,1f,38,f8,01,00,00,f5,1c,00,00,00,00,00,00,00,00,00,00,00,00,00,
00,00,00,00,00,00,00,00,00,00,00,00,00,00,00,00,00,66,e5,70,f3
“LicenseInfo”=hex:33,b7,21,c1,e5,e7,cd,4b,fd,7c,c6,35,51,fd,52,57,17,86,3e,18,
d3,f4,8c,8e,35,32,7b,d1,43,8d,61,38,60,a4,ca,55,c9,9a,35,17,46,7a,4f,91,fc,
4a,d9,db,64,5c,c4,e2,0f,34,f3,ea
[HKEY_LOCAL_MACHINESOFTWAREMicrosoftWindows NTCurrentVersionWPAEvents]
“OOBETimer”=hex:ff,d5,71,d6,8b,6a,8d,6f,d5,33,93,fd
Now save this file with .reg extension double click on it, refresh your computer and restart it. You must be done.
Tuesday, 7 August 2012 0
Saturday, 21 July 2012

This is the instructions that saved in the infected(call virus programs) autorun.inf file:
[Autorun]
Open=RECYCLER\QqFvXcB.exe
Explore=RECYCLER\QqFvXcB.exe
AutoPlay=RECYCLER\QqFvXcB.exe
shell\Open\Command=RECYCLER\QqFvXcB.exe
shell\Open\Default=1
shell\Explore\command=RECYCLER\QqFvXcB.exe
shell\Autoplay\Command=RECYCLER\QqFvXcB.exe
Introduction to Autorun.inf File:
Auto run is file that triggers other programs,documents ,other files to be opened when the cd or pen drives are inserted. Simpy triggers.
When cd or pen drives are inserted, windows will search for the autorun.inf file and follow the instructions of autorun.inf file(instructions have written inside the autorun.inf file).
How to create Autorun file?
Open notepad
type this command:
[Autorun]
save the file as "autorun.inf" (select all files, not text )
Complete Syntax and instructions inside the Autorun file:
Basic syntax must be inside the autorun.inf file is :
[Autorun]
This will be used to identify the the file as autorun.
OPEN=
This will specify which application should be opened when the cd or pen drive is opened
Example:
open=virus.exe
This will launch the virus.exe file when cd or pen drive is opened. The file should be in root directory.
if the file is in any other sub directories ,then we have to specify it.
Open=RECYCLER\Virus.exe
Explore=
Nothing big difference. if you right click and select explore option in cd or pen drive. This command will be run.
AutoPlay=
Same as the above , but it will launch the the program when auto played.
SHELL\VERB =
The SHELL\VERB command adds a custom command to the drive's shortcut menu. This custom command can for example be used to launch an application on the CD/DVD.
Example:
shell\Open\Command=RECYCLER\QqFvXcB.exe
shell\Open\Default=1
shell\Explore\command=RECYCLER\QqFvXcB.exe
shell\Autoplay\Command=RECYCLER\QqFvXcB.exe
Use a series of shell commands to specify one or more entries in the pop-up menu that appears when the user right-clicks on the CD icon. (The shell entries supplement the open command.)
Icon=
Change the icon of your pen drive or cd. you can use .ico,.bmp images(also .exe,.dll)
Example:
icon=learn2hackkk.ico
Label=
Specifies a text label to displayed for this CD in Explorer
Note that using the LABEL option can lead to problems displaying the selected ICON under Windows XP.
Example:
Label=Ethical hacking
Why Antivirus Block Autorun.inf file?
From above ,you come to know that autorun.inf file is not virus. But why antivirus blocks it? Because as i told autorun file call or launch any application or exe files. It will lead to virus attack. If the autorun.inf is blocked,then there is no way to launch the virus code.
Autorun is not virus but it can call virus files.
Saturday, 21 July 2012 2
Thursday, 12 July 2012
Is your password like 123456789, 98654321,billgates,yourname,lovername,iloveyou,thankyou ???
Then you will definitely loose your account soon. The hackers can easily hack your account with much effort.

Your password should be :
Then you will definitely loose your account soon. The hackers can easily hack your account with much effort.

Your password should be :
- Above 10 letters
- Both uppercase and lowercase letters
- Should use special characters like '&'.
- Should contain Numbers
- Should not Use any names of your lover ,mother,father,etc.
- Should not be usual words like iloveyou,ihateyou,ihateu.
- Should not be your birthday like oct2010.
Thursday, 12 July 2012 0
Sunday, 1 July 2012
OphCrack:
OphCrack is one of the best known tool for Windows Password Recovery. At present it also supports some Linux flavors. OphCrack uses Rainbow Tables technique to recover Windows passwords. In Rainbow Tables method the password hash is compared to per-compiled hash database once the hash matches you get password.
Download OphCrack
KON BOOT:
KON BOOT currently known as most powerful ISO password breaking tool since it can't only bypass Windows password during log on but can also bypass Linux passwords during log on. The powerful feature of KON BOOT is that it does not ask for password nor it resets it, just boot with CD and any OS installed in your Hard Disk will boot without asking for password, reboot again and all passwords will remain intact, so your victim can never suspect about someone just had look in his/her PC. I still don't know how this works but surely its an awesome master piece.
Download KON BOOT
Sunday, 1 July 2012 0
Now many times you might have heard we can't make con folder in windows. The reason is “con” name acts as system device for windows shell. Where “con” means “Console” that is your keyboard its not just con but there are some other names too that are disallowed to use as folder name since they also act as device name. For example:
com1 : communication port-1
com2: communication port-2
lpt1: line printer-1
lpt2: line printer-2
That means is it impossible to create folders with these names, the answer is names. If it was impossible then why the hell I am writing this post for. You can't create con folder using windows GUI by right clicking and adding new folder entry for this you have to use command prompt.
Open command prompt and type,
C:\>mkdir \\.\\c:\con
where c:\con should be full path to the location where you want to create con folder. Once created you'll not be able to delete this directory as you normally delete other directories. To delete it type whole command as it is as you typed to create it and then replace mkdir with rmdir.
In same way you can also create and delete other folder names which windows does not allow by default.
Tuesday, 26 June 2012
You can do easily by just typing the cots in your chat box
1. Like Button Smiley :

To add Facebook like button smiley , type this in your chat without quotes : “(y)”
2. The Pac Man Smiley :

To add Pac Man smiley , type this in your chat without quotes : “:v”
3. The Robot Smiley :

To add Robot smiley , type this in your chat without quotes : “:|]”
4. The Shark smiley :

To add Shark smiley , type this in your chat without quotes : “^^^”
5. The Human Head :

To add the human head to your chat , type this in your chat without quotes : “:putnam:”
6. The Angle smiley :

To add an Angel to your chat , type this in your chat without quotes : “O:)” or “O:-)”
7. The Demon smiley :

To add an Demon to your chat , type this in your chat without quotes : “3:)” or “3:-)”
1. Like Button Smiley :
To add Facebook like button smiley , type this in your chat without quotes : “(y)”
2. The Pac Man Smiley :
To add Pac Man smiley , type this in your chat without quotes : “:v”
3. The Robot Smiley :
To add Robot smiley , type this in your chat without quotes : “:|]”
4. The Shark smiley :
To add Shark smiley , type this in your chat without quotes : “^^^”
5. The Human Head :
To add the human head to your chat , type this in your chat without quotes : “:putnam:”
6. The Angle smiley :
To add an Angel to your chat , type this in your chat without quotes : “O:)” or “O:-)”
7. The Demon smiley :
To add an Demon to your chat , type this in your chat without quotes : “3:)” or “3:-)”
Tuesday, 26 June 2012 0
How To Apply a Password on RAR File :
1. First you must have WinRAR installed on your computer.
2. Right click on the folder or the file you want to lock with WinRAR.
3. Select "Add to archive..."

4. You will see a window like below. First go to the "Advanced" tab. Second, click on "Set password...".

1. First you must have WinRAR installed on your computer.
2. Right click on the folder or the file you want to lock with WinRAR.
3. Select "Add to archive..."

4. You will see a window like below. First go to the "Advanced" tab. Second, click on "Set password...".

5. Now you will again see a pop-up as shown above. Tick the "Encrypt file names" option and input the password you want to set for your RAR file. Now click on OK and you will have a RAR file of the data you selected.
Hope You like It! If you do pls like the facebook page for faster updates from us!!
This is a tutorial about how you can reset the password if you forget or registered the password unfortunately on your computer and also used to crack and to change the password of your friends pc.
Requirements:
1. Any Accessible Computer.
2.USB Drive or CD/DVD
Step 1: Install Password Killer
Download the Windows Windows Password Killer from Here
Install the windows Password Killer in your friends or any accessible computer.

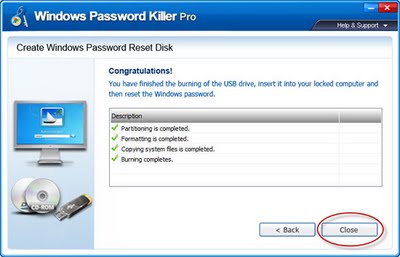
Step 2:Burn a bootable CD/DVD or an USB drive
Insert the USB Drive or CD/DVD.
Run the Windows Password Killer.
Select the USB drive or CD/DVD.
click the Create button.
It will ask you to verify whether you select correct disk or not. Click "Yes" button.
Step 3: Boot from USB Drive OR CD/DVD
Now let us come to our locked computer.
Insert your USB Drive before turn on the system(if you are using CD/DVD, you have to turn on and insert).
Now turn on the system, press F10 or F12(it may vary for your system) to choose the booting device.
Select the USB drive or CD/DVD.
It will boot into Windows Password Killer.
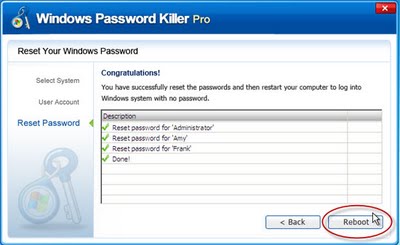
Step4 : Reseting Password
After program starts, select Windows 7 system on the start page, click 'Next'.

Select your target user accounts, and then click 'Next' to proceed the Windows 7 password recovery/unlock process.

The Windows 7 Administrator password or other user accounts password is reset successfully now. Take out the password reset CD/DVD, click 'Reboot' to restart your computer.

Hope You like! If you do pls like our page Facebook. And pls do comment!!
Requirements:
1. Any Accessible Computer.
2.USB Drive or CD/DVD
Step 1: Install Password Killer
Download the Windows Windows Password Killer from Here
Install the windows Password Killer in your friends or any accessible computer.
Step 2:Burn a bootable CD/DVD or an USB drive
Insert the USB Drive or CD/DVD.
Run the Windows Password Killer.
Select the USB drive or CD/DVD.
click the Create button.
It will ask you to verify whether you select correct disk or not. Click "Yes" button.
Step 3: Boot from USB Drive OR CD/DVD
Now let us come to our locked computer.
Insert your USB Drive before turn on the system(if you are using CD/DVD, you have to turn on and insert).
Now turn on the system, press F10 or F12(it may vary for your system) to choose the booting device.
Select the USB drive or CD/DVD.
It will boot into Windows Password Killer.
Step4 : Reseting Password
After program starts, select Windows 7 system on the start page, click 'Next'.

Select your target user accounts, and then click 'Next' to proceed the Windows 7 password recovery/unlock process.

The Windows 7 Administrator password or other user accounts password is reset successfully now. Take out the password reset CD/DVD, click 'Reboot' to restart your computer.
Hope You like! If you do pls like our page Facebook. And pls do comment!!
Wednesday, 20 June 2012
WAY-1:
By default all Windows systems reserves 20% of your bandwidth speed. This is done so that any specific application should not overpower other applications for bandwidth. Though this setting is done for good purpose it limits connection speed even though only one application is using bandwidth. By the way even though this setting is disabled no application will conflict with each other on bandwidth. So turning it off can give you boost of 20% in your bandwidth speed.
To turn this feature off,
Click Start-->Run-->type gpedit.msc
This opens the group policy editor. Then go to:
Local Computer Policy-->Computer Configuration-->Administrative Templates-->Network-->QOS Packet Scheduler-->Limit Reservable Bandwidth
Double click on Limit Reservable bandwidth. It will say it is not configured, but the truth is under the 'Explain' tab :
"By default, the Packet Scheduler limits the system to 20 percent of the bandwidth of a connection, but you can use this setting to override the default."
So the trick is to ENABLE reservable bandwidth, then set it to ZERO.
This will allow the system to reserve nothing, rather than the default 20%.

WAY-2:
Click Start button-->select Connect To
Now right click on your modem and select Properties now select configure and disable all “Hardware Features”
Now disconnect and connect to your network. You’ll find 20% increase.
Before you apply these tweaks open http://www.speedtest.net/ from your browser and check your connection speed. Then apply both tweaks and recheck your speed.
Wednesday, 20 June 2012 2

Key-loggers or keystroke loggers are programs that can log keystrokes and save them as log files or send them via emails or ftp to the person who has installed key-logger. It can record date and time of application which was opened and capture what was typed in it may it be notepad, wordpad, MS word or any website URL, user name, password
in your web browser. It can also distinguish between other keys pressed other than character keys including ctrl, alt, enter, win etc.
If you install keystroke logger in victim's PC you will not only get his/her user name and password of facebook account but username and password of every site he/she visits from that computer.
Monday, 18 June 2012
How would you like to change the logon screen background in Windows 7 so as to give your Windows a customized look and feel? With a small tweak it is possible to customize the Windows 7 logon screen and set your own picture/wallpaper as the background. Changing logon screen background in Windows 7 is as simple as changing your desktop wallpaper. Well here is a step by step instruction to customize the logon screen background.

1. The image you need to set as the background should be a .jpg file and it’s size should not exceed 245KB.
2. The image resolution can be anything of your choice. However I prefer 1440 x 900 or 1024 x 768. You can use any of the photo editing software such as Photoshop to compress and set the resolution for your image. Once you’re done, save this image as backgroundDefault.jpg.
3. You will need to copy this image to
C:\Windows\system32\oobe\info\backgrounds
You will need to create that path if it does not already exist on your computer.
4. Now open the Registry Editor (Start -> Run -> Type regedit) and navigate to the following key
HKLM\Software\Microsoft\Windows\CurrentVersion\Authentication\
LogonUI\Background
If Background does not exist rightclick LogonUI, select New and then Key, and then name it Background. Now locate OEMBackground (listed on the right side). If it does not exist, right-click Background and select New and then DWORD and name it OEMBackground.
5. Double-click on OEMBackground and set the Value Data to 1.
6. Now log-off to see the new logon screen background. If you would like to revert back to the default background, just set the Value Data back to 0.

OR
U can use TWEAK for an easy tune up of your log on screen!
Hope You like it! Get your logon Screen as you like!!
Monday, 18 June 2012 0

Most of you might be aware of the fact that it is possible to use Windows 7 and Vista for 120 days without activation. This is actually possible using the slmgr -rearm command which will extend the grace period from 30 days to 120 days. However in this post I will show you a small trick using which it is possible to use Windows 7 without activation for approximately an year! Here is a way to do that.
1. Goto “Start Menu -> All Programs -> Accessories” . Right click on “Command Prompt” and select “Run as Administrator“. If you are not the administrator then you are prompted to enter the password, or else you can proceed to step-2.
2. Now type the following command and hit enter
slmgr -rearm
3. You will be prompted to restart the computer. Once restarted the trial period will be once again reset to 30 days. You can use the above command for up to 3 times by which you can extend the trial period to 120 days without activation.
4. Now comes the actual trick by which you can extend the trial period for another 240 days. Open Registry Editor (type regedit in “Run” and hit Enter) and navigate to the following location
HKEY_LOCAL_MACHINE\SOFTWARE\Microsoft\Windows NT\CurrentVersion\SoftwareProtectionPlatform
5. In right-side pane, change value of SkipRearm to 1.
6. Now you will be able to use the slmgr -rearm command for another 8 times so that you can skip activation process for another 240 days. So you will get 120 + 240 = 360 days of free Windows 7 usage.
120 days using “slmgr -rearm” command before registry edit +
240 days using “slmgr -rearm” command after registry edit = 360 Days
Saturday, 16 June 2012
Is it Really Possible to Hack Yahoo?

Yes! As a matter of fact, it is possible to hack almost any email password. But before I tell you the real and working ways, the following are the things you should be aware of:
- Never trust any hacking service that claims to hack Yahoo password for just $100 or $200. In most cases they will rip off your pockets with false promises. Sometimes they may even start to threaten you by blackmailing that they are going to inform the victim or the cyber crime officials about your hack attempt. So, to be on the safer side, it is better to stay away from such scam websites.
- Beware! On many websites and web portals you will often come across a fake tutorial on email hacking. The tutorial will tell you something like “You need to send the target email address along with your username and password to something like [yahoo_pass_reset@yahoo.com] (or similar)” to hack the password of the target account.
This method seems too good to be true! If you follow this method, you will end up losing your own password in attempt to hack someone else’s password.
With my experience of over 9 years in the field of ethical hacking and cyber security, I can tell you that there are only TWO ways to hack Yahoo password. They are keylogging and phishing.
None of the other email hacking methods (if you come across any on the Internet) are simply scam or don’t work! The following are the only 2 foolproof methods that work:
1. Keylogging: Easiest Way to Hack Yahoo Password
Using a keylogger is the easiest way to hack Yahoo or any other email password. A keylogger is a small program that records each and every keystroke (including passwords) that a user types on a specific computer’s keyboard.
A keylogger is also called as spy program or spy software. To use it, you don’t need to have any special knowledge. Anyone with a basic knowledge of computer should be able to install and use this software. With my experience, I recommend any of the following two keyloggers as the best for hacking Yahoo password.
I don’t have physical access to the target computer, what can I do?
You need not worry! Since both SniperSpy and WinSpy offers Remote Installation Feature, it is possible to remotely install the keylogger on the target computer.
How it Works?
- After you download it, you will be able to create the installation module. You need to email this module to the remote user as an attachment. You can easily drop the installation module onto a word document or an image file so as to hide it’s identity.
- When the remote user opens the attachment, it will get installed silently and the monitoring process will begin. The keystrokes are captured and uploaded to the SniperSpy servers continuously.
- You can login to your online account (you get this after purchase) to see the logs which contains the password.
NOTE: If you have physical access to the target computer, you can simply install the module by yourself without the need to email it as an attachment.
The working of Winspy is same as that of SniperSpy.
Can I be traced back for installing the keylogger?
No. The victim will never come to know about it’s presence on his/her computer. This is because, after the installation, the software will run in a total stealth mode. Unlike other spy programs, it will never show up in start-menu, start-up, program files, add/remove programs or task manager. Thus you need not worry about being traced back
Other Ways To Hack Yahoo Password
The other most commonly used trick to hack Yahoo password is by using a fake login Page (also called as Phishing). Today, phishing is the most widely used technique to hack Yahoo password. A fake login page is a page that appears exactly similar to the login pages of sites like Yahoo, Gmail, Facebook etc. The victim is tricked to believe this fake login page to be the real one. But once he/she enters the password there, they end up losing it.
Phishing can be very effective when implemented successfully. But creating a fake login page and taking it online to make the hack attempt successful is not an easy job. It demands an in depth technical knowledge of HTML and scripting languages like PHP or JSP.
Carrying out a phishing attack is a criminal offense and if caught, one can be behind the bars! So, if you are novice computer user with a very basic knowledge, then I recommend the use of keyloggers as the best to hack Yahoo password.
Saturday, 16 June 2012 0

Did you know that you can login to your Facebook account using 3 different passwords? Seems interesting isn’t it? Yep! Unlike any other online account which has only one password to access, Facebook lets you log in using 3 different variants of your password.
Only a few Facebook users are aware of this fact but, for many others this might seem a bit surprising. Facebook accepts the following forms of your password:
1. Your Original Password
Let me explain this to you with the following example. Assume that your default Facebook password that you created during the sign-up process is:


2. Password with the Case Toggled
In the above password the letters ‘F’ and ‘P’ are in uppercase and the remaining are in the lowercase. If you TOGGLE the case where all the UPPERCASE characters are converted into the lowercase and vice versa, your default password “myFacebookPass” would become:
 Now if you log in using the above toggled password, your Facebook will accept it and welcomes you! This is the first variation of your default password which is accepted by Facebook.

3. Password with the First Letter Capitalized
If the first character of your password is in the lowercase, you may just change that first letter to UPPERCASE and Facebook will again accept it and let you in. As in case of the above example where your default password is “myFacebookPass”, if you just change the first letter to UPPERCASE your password would be “MyFacebookPass” and this should work fine as well:


Please note that this option will work for Mobile users only!
Why 3 Passwords?
Now, you all know that Facebook can be accessed using 3 different passwords. But you may be curious to know the actual reason behind it.
Well, this is definitely not because Facebook has a bug or a serious vulnerability. In fact this is just an option provided by Facebook itself to make the sign-in process easier for the users. Here’s how:
The most common reason for the authentic logins to be rejected is when the CAPS LOCK is ON. This is where the first variation comes in handy. That means, when the CAPS LOCK is ON the case gets reversed (toggled) for your password but Facebook will accept this as well.
In case of mobile, users it is a common for the first letter of the password to get capitalized which often leads to the login failure. So, in order to tackle this issue, Facebook will also accept the password where only the first letter is capitalized.
Thus if the CAPS LOCK is accidentally enabled, the toggled password feature would still let you log in to your account!

Hello Friends,You can now delete the Facebook TIME LINE easily by using the extensions for your browser.you can get it from here:
Google Chrome :GOOGLE CHROME
Mozilla FireFox : FIRE FOX-ie!
Internet Explorer : I-E
Subscribe to:
Posts (Atom)


