Showing posts with label Computer Tricks. Show all posts
Showing posts with label Computer Tricks. Show all posts
Saturday, 21 September 2013
If you want to turn off all system beeps like beeping sound from your computer internal speakers!


- Go to START
- Type "Regedit" in run
- Go to HKEY_CURRENT_USER\Control Panel\Sound
- Edit the key Beep and assign it a value of No
That's it no more beeping! :)
- Make sure you like our facebook page for more tricks! Like Us
Saturday, 21 September 2013 0
Wednesday, 2 January 2013
Want to scare your friend by pranking that he is hacked by someone?Here is cool browser hack that will prank your friends ! If your friend is always connected to facebook? Use this trick to fool him up!
Just follow steps below:
1) Launch Mozilla firefox, go to facebook.com and righ click -> Inspect Element

2)Search for the elements Class='title' and class="title fsl fwb fcb"

3)Double click the line: "Facebook helps you connect and share with people in your life" and edit as you wish: the text that gives your friend a big shock for a min!

4)Mission accomplished! You can prank your friends the way you like.
Note:The original page gets restored immediately once the refresh button is clicked!
Hope you like this post! Keep visiting and following the facebook page too!
Just follow steps below:
1) Launch Mozilla firefox, go to facebook.com and righ click -> Inspect Element

2)Search for the elements Class='title' and class="title fsl fwb fcb"

3)Double click the line: "Facebook helps you connect and share with people in your life" and edit as you wish: the text that gives your friend a big shock for a min!

4)Mission accomplished! You can prank your friends the way you like.
Note:The original page gets restored immediately once the refresh button is clicked!
Hope you like this post! Keep visiting and following the facebook page too!
Wednesday, 2 January 2013 0
Monday, 31 December 2012
Most of standard keyboards come with a small numeric keypad which identified by the numbers from 0 to 9. However, this numeric keypad is also served for some other functions such as "Page Up", "Page Down", "End", "Home", etc... depending on which mode of the "Num Lock" is being used.
 Many Windows users find this numeric keypad useful to type the numbers faster. But oopps... after hitting a several keys on the numeric keypad, you recognize the outcomes are not what you expected. Then you recognize the "Num Lock" mode is "OFF", so you just need to switch it on, and... start over your typing! The bad news is, by default, Windows turns the Num Lock off; however, the good news is, you can configure Windows to turn this Num Lock ON so that whenever you mean "number", you really get a number.
Follow the steps:
Open the "Registry Editor" ("Start" >> "Run", then type "regedit" and Enter).
Follow the steps:
Open the "Registry Editor" ("Start" >> "Run", then type "regedit" and Enter).
- Expand to the following key:
HKEY_CURRENT_USER\Control Panel\Keyboard\ - Within the keyboard folder, you should have a string value named "InitialKeyboardIndicators" with a value of 0, 1, or 2.
- Double-click on this string value "InitialKeyboardIndicators" and edit the value to what you want. Below is the explaination of the values:
0: Num Lock is turned OFF on startup
1: Disable Num Lock
2: Num Lock is turned ON on startup
Monday, 31 December 2012 0
Monday, 29 October 2012
Skipscreen is an extension to browser to by pass waiting time on download. Unfortunately it can only be used with Firefox browsers to avoid waiting time while downloading files from some popular File hosting services like:

* Rapidshare.com
* zShare.net
* MediaFire.com
* Megaupload.com
* Sharebee.com
* Depositfiles.com
* Sendspace.com
* Divshare.com
* Linkbucks.com
* Uploaded.to
* Hotfiles.com
* 4shared.com
* Limelinx.com
* Link-Protector.com
Its use is very simple and does not require any configuration, just go to the addon page of the extension and install it, restart your browser and enter one of thesedownload sites and you will no longer have to wait.
Download SkipScreen Add-On
* Rapidshare.com
* zShare.net
* MediaFire.com
* Megaupload.com
* Sharebee.com
* Depositfiles.com
* Sendspace.com
* Divshare.com
* Linkbucks.com
* Uploaded.to
* Hotfiles.com
* 4shared.com
* Limelinx.com
* Link-Protector.com
Its use is very simple and does not require any configuration, just go to the addon page of the extension and install it, restart your browser and enter one of thesedownload sites and you will no longer have to wait.
Download SkipScreen Add-On
Monday, 29 October 2012 0
Saturday, 6 October 2012
ASSOC==>Displays or modifies file extension associations.

AT==>Schedules commands and programs to run on a computer.
ATTRIB==>Displays or changes file attributes.
BREAK==>Sets or clears extended CTRL+C checking.
CACLS==>Displays or modifies access control lists (ACLs) of files.
CALL==>Calls one batch program from another.
CD==>Displays the name of or changes the current directory.
CHCP==>Displays or sets the active code page number.
CHDIR==>Displays the name of or changes the current directory.
CHKDSK==>Checks a disk and displays a status report.
CHKNTFS==>Displays or modifies the checking of disk at boot time.
CLS==>Clears the screen.
CMD==>Starts a new instance of the Windows command interpreter.
COLOR==>Sets the default console foreground and background colors.
COMP==>Compares the contents of two files or sets of files.
COMPACT==>Displays or alters the compression of files on NTFS partitions.
CONVERT==>Converts FAT volumes to NTFS. You cannot convert the current drive.
COPY==>Copies one or more files to another location.
DATE==>Displays or sets the date.
DEL==>Deletes one or more files.
DIR==>Displays a list of files and subdirectories in a directory.
DISKCOMP==>Compares the contents of two floppy disks.
DISKCOPY==>Copies the contents of one floppy disk to another.
DOSKEY==>Edits command lines, recalls Windows commands, and creates macros. ECHO==>Displays messages, or turns command echoing on or off.
ENDLOCAL==>Ends localization of environment changes in a batch file.
ERASE==>Deletes one or more files.
EXIT==>Quits the CMD.EXE program (command interpreter).
FC==>Compares two files or sets of files, and displays the differences between them.FIND==>Searches for a text string in a file or files.
FINDSTR==>Searches for strings in files.
FOR==>Runs a specified command for each file in a set of files.
FORMAT==>Formats a disk for use with Windows.
FTYPE==>Displays or modifies file types used in file extension associations.
GOTO==>Directs the Windows command interpreter to a labeled line in a batch program.
GRAFTABL==>Enables Windows to display an extended character set in graphics mode.
HELP==>Provides Help information for Windows commands.
IF==>Performs conditional processing in batch programs.
LABEL==>Creates, changes, or deletes the volume label of a disk.
MD==>Creates a directory.
MKDIR==>Creates a directory.
MODE==>Configures a system device.
MORE==>Displays output one screen at a time.
MOVE==>Moves one or more files from one directory to another directory.
PATH==>Displays or sets a search path for executable files.
PAUSE==>Suspends processing of a batch file and displays a message.
POPD==>Restores the previous value of the current directory saved by PUSHD.PRINT==>Prints a text file.
PROMPT==>Changes the Windows command prompt.
PUSHD==>Saves the current directory then changes it.
RD==>Removes a directory.
RECOVER==>Recovers readable information from a bad or defective disk.
REM==>Records comments (remarks) in batch files or CONFIG.SYS.
REN==>Renames a file or files.
RENAME==>Renames a file or files.
REPLACE==>Replaces files.
RMDIR==>Removes a directory.
SET==>Displays, sets, or removes Windows environment variables.
SETLOCAL==>Begins localization of environment changes in a batch file.
SHIFT==>Shifts the position of replaceable parameters in batch files.
SORT==>Sorts input.
START==>Starts a separate window to run a specified program or command.
SUBST==>Associates a path with a drive letter.
TIME==>Displays or sets the system time.
TITLE==>Sets the window title for a CMD.EXE session.
TREE==>Graphically displays the directory structure of a drive or path.
TYPE==>Displays the contents of a text file.
VER==>Displays the Windows version.
VERIFY==>Tells Windows whether to verify that your files are written correctly to a disk.
VOL==>Displays a disk volume label and serial number.
XCOPY==>Copies files and directory trees.

AT==>Schedules commands and programs to run on a computer.
ATTRIB==>Displays or changes file attributes.
BREAK==>Sets or clears extended CTRL+C checking.
CACLS==>Displays or modifies access control lists (ACLs) of files.
CALL==>Calls one batch program from another.
CD==>Displays the name of or changes the current directory.
CHCP==>Displays or sets the active code page number.
CHDIR==>Displays the name of or changes the current directory.
CHKDSK==>Checks a disk and displays a status report.
CHKNTFS==>Displays or modifies the checking of disk at boot time.
CLS==>Clears the screen.
CMD==>Starts a new instance of the Windows command interpreter.
COLOR==>Sets the default console foreground and background colors.
COMP==>Compares the contents of two files or sets of files.
COMPACT==>Displays or alters the compression of files on NTFS partitions.
CONVERT==>Converts FAT volumes to NTFS. You cannot convert the current drive.
COPY==>Copies one or more files to another location.
DATE==>Displays or sets the date.
DEL==>Deletes one or more files.
DIR==>Displays a list of files and subdirectories in a directory.
DISKCOMP==>Compares the contents of two floppy disks.
DISKCOPY==>Copies the contents of one floppy disk to another.
DOSKEY==>Edits command lines, recalls Windows commands, and creates macros. ECHO==>Displays messages, or turns command echoing on or off.
ENDLOCAL==>Ends localization of environment changes in a batch file.
ERASE==>Deletes one or more files.
EXIT==>Quits the CMD.EXE program (command interpreter).
FC==>Compares two files or sets of files, and displays the differences between them.FIND==>Searches for a text string in a file or files.
FINDSTR==>Searches for strings in files.
FOR==>Runs a specified command for each file in a set of files.
FORMAT==>Formats a disk for use with Windows.
FTYPE==>Displays or modifies file types used in file extension associations.
GOTO==>Directs the Windows command interpreter to a labeled line in a batch program.
GRAFTABL==>Enables Windows to display an extended character set in graphics mode.
HELP==>Provides Help information for Windows commands.
IF==>Performs conditional processing in batch programs.
LABEL==>Creates, changes, or deletes the volume label of a disk.
MD==>Creates a directory.
MKDIR==>Creates a directory.
MODE==>Configures a system device.
MORE==>Displays output one screen at a time.
MOVE==>Moves one or more files from one directory to another directory.
PATH==>Displays or sets a search path for executable files.
PAUSE==>Suspends processing of a batch file and displays a message.
POPD==>Restores the previous value of the current directory saved by PUSHD.PRINT==>Prints a text file.
PROMPT==>Changes the Windows command prompt.
PUSHD==>Saves the current directory then changes it.
RD==>Removes a directory.
RECOVER==>Recovers readable information from a bad or defective disk.
REM==>Records comments (remarks) in batch files or CONFIG.SYS.
REN==>Renames a file or files.
RENAME==>Renames a file or files.
REPLACE==>Replaces files.
RMDIR==>Removes a directory.
SET==>Displays, sets, or removes Windows environment variables.
SETLOCAL==>Begins localization of environment changes in a batch file.
SHIFT==>Shifts the position of replaceable parameters in batch files.
SORT==>Sorts input.
START==>Starts a separate window to run a specified program or command.
SUBST==>Associates a path with a drive letter.
TIME==>Displays or sets the system time.
TITLE==>Sets the window title for a CMD.EXE session.
TREE==>Graphically displays the directory structure of a drive or path.
TYPE==>Displays the contents of a text file.
VER==>Displays the Windows version.
VERIFY==>Tells Windows whether to verify that your files are written correctly to a disk.
VOL==>Displays a disk volume label and serial number.
XCOPY==>Copies files and directory trees.
Saturday, 6 October 2012 0
Friday, 21 September 2012
First you should go
“start > run >eventvwr.msc”
Events are stored in three log files: Application, Security, and System. These logs can be reviewed and archived.
For our purposes we want the System log. Click on “System” in the left-hand column for a list of events.

“start > run >eventvwr.msc”
Events are stored in three log files: Application, Security, and System. These logs can be reviewed and archived.
For our purposes we want the System log. Click on “System” in the left-hand column for a list of events.

Look for a date and time when you weren’t home and your computer should have been off.
Double click on the eg: info and it will show u the detail.
You can also use this log to see how long someone was on the computer. Just look at the time the computer was turned on and off for that day.
Hope u all will like it.@Crusader :)
Double click on the eg: info and it will show u the detail.
You can also use this log to see how long someone was on the computer. Just look at the time the computer was turned on and off for that day.
Hope u all will like it.@Crusader :)
Friday, 21 September 2012 0
Wednesday, 19 September 2012
By this trick you can show your processor as pentium i7 or What ever u like
GO TO START>RUN>TYPE REGEDIT>HKEY_LOCAL_MACHINE>HARDWARE>DISCRIPTION>SYSTEM>CENTRAL
PROCESSOR>ON RIGHT HAND SIDE RIGHT CLICK ON PROCESSOR NAME AND STRING AND THE CLICK ON
MODIFY AND WRITE WHAT EVER YOU WANT.

Hope you like it! If you like please keep visiting for more! @Crusader :)
Wednesday, 19 September 2012 0
You may have visited a lot of sites which have disabled right click in it… it’s really, really annoying.
 Like orkut has disabled clicking right click on album view foler, so that you can not save photos by right clicking and selecting save as image.
So here is the tutorial which enables right click


So here is the tutorial which enables right click
For Internet Explorer users:
- Click “Tools”>”Internet Options”
- Click the “Security” tab
- Click “Custom Level”
- Scroll down to the “Scripting” section
- Set “Active Scripting” to “disable”
- Click “Ok”.

For Firefox users:
- Click “Tools”>”Options”
- Click the “Content” tab
- Uncheck “Enable Javascript” (Set “Enable Javascript” to “disable” )
- Click “Ok”.

Tuesday, 7 August 2012
 You have a copy of Windows XP which several times pop up message about its activation, you don't have internet connection to activate your XP. So here's the trick that can help you get rid of this problem. Please note that this trick will only work on ordinary Windows XP SP1-SP2 installation that too before installing any other program on it i.e
your installation must be fresh to make this trick work out. Also it will not work on OEM version of Windows XP so if this trick doesn't work for you check your copy for OEM.
Method :
Open Notepad and copy following lines in it,
Windows Registry Editor Version 5.00
[HKEY_LOCAL_MACHINESOFTWAREMicrosoftWindows NTCurrentVersion]
“CurrentBuild”=”1.511.1 () (Obsolete data – do not use)”
“ProductId”=”55274-640-1011873-23081″
“DigitalProductId”=hex:a4,00,00,00,03,00,00,00,35,35,32,37,34,2d,36,34,30,2d,
31,30,31,31,38,37,33,2d,32,33,30,38,31,00,2e,00,00,00,41,32,32,2d,30,30,30,
30,31,00,00,00,00,00,00,00,86,56,4e,4c,21,1b,2b,6a,a3,78,8e,8f,98,5c,00,00,
00,00,00,00,dd,da,47,41,cc,6b,06,00,00,00,00,00,00,00,00,00,00,00,00,00,00,
00,00,00,00,00,00,00,00,00,00,00,38,31,30,32,36,00,00,00,00,00,00,00,b5,16,
00,00,83,83,1f,38,f8,01,00,00,f5,1c,00,00,00,00,00,00,00,00,00,00,00,00,00,
00,00,00,00,00,00,00,00,00,00,00,00,00,00,00,00,00,66,e5,70,f3
“LicenseInfo”=hex:33,b7,21,c1,e5,e7,cd,4b,fd,7c,c6,35,51,fd,52,57,17,86,3e,18,
d3,f4,8c,8e,35,32,7b,d1,43,8d,61,38,60,a4,ca,55,c9,9a,35,17,46,7a,4f,91,fc,
4a,d9,db,64,5c,c4,e2,0f,34,f3,ea
[HKEY_LOCAL_MACHINESOFTWAREMicrosoftWindows NTCurrentVersionWPAEvents]
“OOBETimer”=hex:ff,d5,71,d6,8b,6a,8d,6f,d5,33,93,fd
[HKEY_LOCAL_MACHINESOFTWAREMicrosoftWindows NTCurrentVersion]
“CurrentBuild”=”1.511.1 () (Obsolete data – do not use)”
“ProductId”=”55274-640-1011873-23081″
“DigitalProductId”=hex:a4,00,00,00,03,00,00,00,35,35,32,37,34,2d,36,34,30,2d,
31,30,31,31,38,37,33,2d,32,33,30,38,31,00,2e,00,00,00,41,32,32,2d,30,30,30,
30,31,00,00,00,00,00,00,00,86,56,4e,4c,21,1b,2b,6a,a3,78,8e,8f,98,5c,00,00,
00,00,00,00,dd,da,47,41,cc,6b,06,00,00,00,00,00,00,00,00,00,00,00,00,00,00,
00,00,00,00,00,00,00,00,00,00,00,38,31,30,32,36,00,00,00,00,00,00,00,b5,16,
00,00,83,83,1f,38,f8,01,00,00,f5,1c,00,00,00,00,00,00,00,00,00,00,00,00,00,
00,00,00,00,00,00,00,00,00,00,00,00,00,00,00,00,00,66,e5,70,f3
“LicenseInfo”=hex:33,b7,21,c1,e5,e7,cd,4b,fd,7c,c6,35,51,fd,52,57,17,86,3e,18,
d3,f4,8c,8e,35,32,7b,d1,43,8d,61,38,60,a4,ca,55,c9,9a,35,17,46,7a,4f,91,fc,
4a,d9,db,64,5c,c4,e2,0f,34,f3,ea
[HKEY_LOCAL_MACHINESOFTWAREMicrosoftWindows NTCurrentVersionWPAEvents]
“OOBETimer”=hex:ff,d5,71,d6,8b,6a,8d,6f,d5,33,93,fd
Now save this file with .reg extension double click on it, refresh your computer and restart it. You must be done.
Tuesday, 7 August 2012 0
Saturday, 21 July 2012

This is the instructions that saved in the infected(call virus programs) autorun.inf file:
[Autorun]
Open=RECYCLER\QqFvXcB.exe
Explore=RECYCLER\QqFvXcB.exe
AutoPlay=RECYCLER\QqFvXcB.exe
shell\Open\Command=RECYCLER\QqFvXcB.exe
shell\Open\Default=1
shell\Explore\command=RECYCLER\QqFvXcB.exe
shell\Autoplay\Command=RECYCLER\QqFvXcB.exe
Introduction to Autorun.inf File:
Auto run is file that triggers other programs,documents ,other files to be opened when the cd or pen drives are inserted. Simpy triggers.
When cd or pen drives are inserted, windows will search for the autorun.inf file and follow the instructions of autorun.inf file(instructions have written inside the autorun.inf file).
How to create Autorun file?
Open notepad
type this command:
[Autorun]
save the file as "autorun.inf" (select all files, not text )
Complete Syntax and instructions inside the Autorun file:
Basic syntax must be inside the autorun.inf file is :
[Autorun]
This will be used to identify the the file as autorun.
OPEN=
This will specify which application should be opened when the cd or pen drive is opened
Example:
open=virus.exe
This will launch the virus.exe file when cd or pen drive is opened. The file should be in root directory.
if the file is in any other sub directories ,then we have to specify it.
Open=RECYCLER\Virus.exe
Explore=
Nothing big difference. if you right click and select explore option in cd or pen drive. This command will be run.
AutoPlay=
Same as the above , but it will launch the the program when auto played.
SHELL\VERB =
The SHELL\VERB command adds a custom command to the drive's shortcut menu. This custom command can for example be used to launch an application on the CD/DVD.
Example:
shell\Open\Command=RECYCLER\QqFvXcB.exe
shell\Open\Default=1
shell\Explore\command=RECYCLER\QqFvXcB.exe
shell\Autoplay\Command=RECYCLER\QqFvXcB.exe
Use a series of shell commands to specify one or more entries in the pop-up menu that appears when the user right-clicks on the CD icon. (The shell entries supplement the open command.)
Icon=
Change the icon of your pen drive or cd. you can use .ico,.bmp images(also .exe,.dll)
Example:
icon=learn2hackkk.ico
Label=
Specifies a text label to displayed for this CD in Explorer
Note that using the LABEL option can lead to problems displaying the selected ICON under Windows XP.
Example:
Label=Ethical hacking
Why Antivirus Block Autorun.inf file?
From above ,you come to know that autorun.inf file is not virus. But why antivirus blocks it? Because as i told autorun file call or launch any application or exe files. It will lead to virus attack. If the autorun.inf is blocked,then there is no way to launch the virus code.
Autorun is not virus but it can call virus files.
Saturday, 21 July 2012 2
Sunday, 1 July 2012
OphCrack:
OphCrack is one of the best known tool for Windows Password Recovery. At present it also supports some Linux flavors. OphCrack uses Rainbow Tables technique to recover Windows passwords. In Rainbow Tables method the password hash is compared to per-compiled hash database once the hash matches you get password.
Download OphCrack
KON BOOT:
KON BOOT currently known as most powerful ISO password breaking tool since it can't only bypass Windows password during log on but can also bypass Linux passwords during log on. The powerful feature of KON BOOT is that it does not ask for password nor it resets it, just boot with CD and any OS installed in your Hard Disk will boot without asking for password, reboot again and all passwords will remain intact, so your victim can never suspect about someone just had look in his/her PC. I still don't know how this works but surely its an awesome master piece.
Download KON BOOT
OphCrack is one of the best known tool for Windows Password Recovery. At present it also supports some Linux flavors. OphCrack uses Rainbow Tables technique to recover Windows passwords. In Rainbow Tables method the password hash is compared to per-compiled hash database once the hash matches you get password.
Download OphCrack
KON BOOT:
KON BOOT currently known as most powerful ISO password breaking tool since it can't only bypass Windows password during log on but can also bypass Linux passwords during log on. The powerful feature of KON BOOT is that it does not ask for password nor it resets it, just boot with CD and any OS installed in your Hard Disk will boot without asking for password, reboot again and all passwords will remain intact, so your victim can never suspect about someone just had look in his/her PC. I still don't know how this works but surely its an awesome master piece.
Download KON BOOT
Sunday, 1 July 2012 0
Now many times you might have heard we can't make con folder in windows. The reason is “con” name acts as system device for windows shell. Where “con” means “Console” that is your keyboard its not just con but there are some other names too that are disallowed to use as folder name since they also act as device name. For example:
com1 : communication port-1
com2: communication port-2
lpt1: line printer-1
lpt2: line printer-2
That means is it impossible to create folders with these names, the answer is names. If it was impossible then why the hell I am writing this post for. You can't create con folder using windows GUI by right clicking and adding new folder entry for this you have to use command prompt.
Open command prompt and type,
C:\>mkdir \\.\\c:\con
where c:\con should be full path to the location where you want to create con folder. Once created you'll not be able to delete this directory as you normally delete other directories. To delete it type whole command as it is as you typed to create it and then replace mkdir with rmdir.
In same way you can also create and delete other folder names which windows does not allow by default.
com1 : communication port-1
com2: communication port-2
lpt1: line printer-1
lpt2: line printer-2
That means is it impossible to create folders with these names, the answer is names. If it was impossible then why the hell I am writing this post for. You can't create con folder using windows GUI by right clicking and adding new folder entry for this you have to use command prompt.
Open command prompt and type,
C:\>mkdir \\.\\c:\con
where c:\con should be full path to the location where you want to create con folder. Once created you'll not be able to delete this directory as you normally delete other directories. To delete it type whole command as it is as you typed to create it and then replace mkdir with rmdir.
In same way you can also create and delete other folder names which windows does not allow by default.
Tuesday, 26 June 2012
You can do easily by just typing the cots in your chat box
1. Like Button Smiley :

To add Facebook like button smiley , type this in your chat without quotes : “(y)”
2. The Pac Man Smiley :

To add Pac Man smiley , type this in your chat without quotes : “:v”
3. The Robot Smiley :

To add Robot smiley , type this in your chat without quotes : “:|]”
4. The Shark smiley :

To add Shark smiley , type this in your chat without quotes : “^^^”
5. The Human Head :

To add the human head to your chat , type this in your chat without quotes : “:putnam:”
6. The Angle smiley :

To add an Angel to your chat , type this in your chat without quotes : “O:)” or “O:-)”
7. The Demon smiley :

To add an Demon to your chat , type this in your chat without quotes : “3:)” or “3:-)”
1. Like Button Smiley :
To add Facebook like button smiley , type this in your chat without quotes : “(y)”
2. The Pac Man Smiley :
To add Pac Man smiley , type this in your chat without quotes : “:v”
3. The Robot Smiley :
To add Robot smiley , type this in your chat without quotes : “:|]”
4. The Shark smiley :
To add Shark smiley , type this in your chat without quotes : “^^^”
5. The Human Head :
To add the human head to your chat , type this in your chat without quotes : “:putnam:”
6. The Angle smiley :
To add an Angel to your chat , type this in your chat without quotes : “O:)” or “O:-)”
7. The Demon smiley :
To add an Demon to your chat , type this in your chat without quotes : “3:)” or “3:-)”
Tuesday, 26 June 2012 0
How To Apply a Password on RAR File :
1. First you must have WinRAR installed on your computer.
2. Right click on the folder or the file you want to lock with WinRAR.
3. Select "Add to archive..."

4. You will see a window like below. First go to the "Advanced" tab. Second, click on "Set password...".

1. First you must have WinRAR installed on your computer.
2. Right click on the folder or the file you want to lock with WinRAR.
3. Select "Add to archive..."

4. You will see a window like below. First go to the "Advanced" tab. Second, click on "Set password...".

5. Now you will again see a pop-up as shown above. Tick the "Encrypt file names" option and input the password you want to set for your RAR file. Now click on OK and you will have a RAR file of the data you selected.
Hope You like It! If you do pls like the facebook page for faster updates from us!!
This is a tutorial about how you can reset the password if you forget or registered the password unfortunately on your computer and also used to crack and to change the password of your friends pc.
Requirements:
1. Any Accessible Computer.
2.USB Drive or CD/DVD
Step 1: Install Password Killer
Download the Windows Windows Password Killer from Here
Install the windows Password Killer in your friends or any accessible computer.

Step 2:Burn a bootable CD/DVD or an USB drive
Insert the USB Drive or CD/DVD.
Run the Windows Password Killer.
Select the USB drive or CD/DVD.
click the Create button.
It will ask you to verify whether you select correct disk or not. Click "Yes" button.
Step 3: Boot from USB Drive OR CD/DVD
Now let us come to our locked computer.
Insert your USB Drive before turn on the system(if you are using CD/DVD, you have to turn on and insert).
Now turn on the system, press F10 or F12(it may vary for your system) to choose the booting device.
Select the USB drive or CD/DVD.
It will boot into Windows Password Killer.
Step4 : Reseting Password
After program starts, select Windows 7 system on the start page, click 'Next'.

Select your target user accounts, and then click 'Next' to proceed the Windows 7 password recovery/unlock process.

The Windows 7 Administrator password or other user accounts password is reset successfully now. Take out the password reset CD/DVD, click 'Reboot' to restart your computer.

Hope You like! If you do pls like our page Facebook. And pls do comment!!
Requirements:
1. Any Accessible Computer.
2.USB Drive or CD/DVD
Step 1: Install Password Killer
Download the Windows Windows Password Killer from Here
Install the windows Password Killer in your friends or any accessible computer.
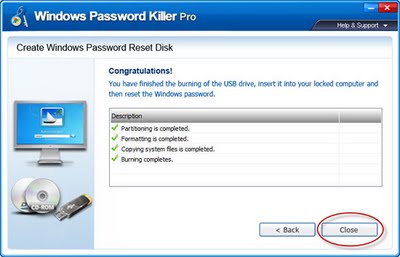
Step 2:Burn a bootable CD/DVD or an USB drive
Insert the USB Drive or CD/DVD.
Run the Windows Password Killer.
Select the USB drive or CD/DVD.
click the Create button.
It will ask you to verify whether you select correct disk or not. Click "Yes" button.
Step 3: Boot from USB Drive OR CD/DVD
Now let us come to our locked computer.
Insert your USB Drive before turn on the system(if you are using CD/DVD, you have to turn on and insert).
Now turn on the system, press F10 or F12(it may vary for your system) to choose the booting device.
Select the USB drive or CD/DVD.
It will boot into Windows Password Killer.
Step4 : Reseting Password
After program starts, select Windows 7 system on the start page, click 'Next'.

Select your target user accounts, and then click 'Next' to proceed the Windows 7 password recovery/unlock process.

The Windows 7 Administrator password or other user accounts password is reset successfully now. Take out the password reset CD/DVD, click 'Reboot' to restart your computer.
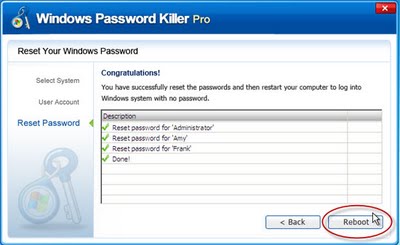
Hope You like! If you do pls like our page Facebook. And pls do comment!!
Wednesday, 20 June 2012
WAY-1:
By default all Windows systems reserves 20% of your bandwidth speed. This is done so that any specific application should not overpower other applications for bandwidth. Though this setting is done for good purpose it limits connection speed even though only one application is using bandwidth. By the way even though this setting is disabled no application will conflict with each other on bandwidth. So turning it off can give you boost of 20% in your bandwidth speed.
To turn this feature off,
Click Start-->Run-->type gpedit.msc
This opens the group policy editor. Then go to:
Local Computer Policy-->Computer Configuration-->Administrative Templates-->Network-->QOS Packet Scheduler-->Limit Reservable Bandwidth
Double click on Limit Reservable bandwidth. It will say it is not configured, but the truth is under the 'Explain' tab :
"By default, the Packet Scheduler limits the system to 20 percent of the bandwidth of a connection, but you can use this setting to override the default."
So the trick is to ENABLE reservable bandwidth, then set it to ZERO.
This will allow the system to reserve nothing, rather than the default 20%.

WAY-2:
Click Start button-->select Connect To
Now right click on your modem and select Properties now select configure and disable all “Hardware Features”
Now disconnect and connect to your network. You’ll find 20% increase.
Before you apply these tweaks open http://www.speedtest.net/ from your browser and check your connection speed. Then apply both tweaks and recheck your speed.
By default all Windows systems reserves 20% of your bandwidth speed. This is done so that any specific application should not overpower other applications for bandwidth. Though this setting is done for good purpose it limits connection speed even though only one application is using bandwidth. By the way even though this setting is disabled no application will conflict with each other on bandwidth. So turning it off can give you boost of 20% in your bandwidth speed.
To turn this feature off,
Click Start-->Run-->type gpedit.msc
This opens the group policy editor. Then go to:
Local Computer Policy-->Computer Configuration-->Administrative Templates-->Network-->QOS Packet Scheduler-->Limit Reservable Bandwidth
Double click on Limit Reservable bandwidth. It will say it is not configured, but the truth is under the 'Explain' tab :
"By default, the Packet Scheduler limits the system to 20 percent of the bandwidth of a connection, but you can use this setting to override the default."
So the trick is to ENABLE reservable bandwidth, then set it to ZERO.
This will allow the system to reserve nothing, rather than the default 20%.

WAY-2:
Click Start button-->select Connect To
Now right click on your modem and select Properties now select configure and disable all “Hardware Features”
Now disconnect and connect to your network. You’ll find 20% increase.
Before you apply these tweaks open http://www.speedtest.net/ from your browser and check your connection speed. Then apply both tweaks and recheck your speed.
Wednesday, 20 June 2012 2
Thursday, 31 May 2012
ScribeFire (previously Performancing for Firefox)
by Christopher Finke, PerformancingScribeFire (previously Performancing for Firefox) is a full-featured blog editor that integrates with your browser and lets you easily post to your blog.
Version 1.4.0.1 — March 28, 2007
Organizing and sharing your pictures is easier than ever with Firefox Companion for Kodak EasyShare Gallery. Upload photos directly to your Kodak EasyShare Gallery, all within your browser. Drag, drop and arrange pictures adding photo titles, and...
Version 1.0.9.2 — February 14, 2007
Allows you to customize the way a webpage displays using small bits of JavaScript. ...
Version 0.7.20070607.0 — June 7, 2007
If you use Firefox on more than one computer, you'll want Foxmarks. Install Foxmarks on each computer, and it will work silently in the background to keep your bookmarks synchronized. As a bonus, log in to my.foxmarks.com from any computer anywhere to access your bookmarks.
Version 1.0.1 — May 7, 2007
With Clipmarks, you can clip the best parts of web pages. Whether it's a paragraph, sentence, image or video, you can capture just the pieces you want without having to bookmark the entire page.
Version 2.0.5 — May 24, 2007
Jeteye is a unique Web-based application and service that is designed for the next generation of enterprise and consumer use of the Web. Jeteye changes how we interact with the web, in an era where communication and social computing are more...
Version 1.0.2.20070118114558 — January 18, 2007
While you are surfing Yoono instantly reveals what others have discovered: websites, people and articles. Create a rich scrapbook of your favorite stuff with the new "Buzz It!" feature, one-click grab and share videos, photos and texts from any web page.
Version 4.0.1.4774 — June 4, 2007
BlueOrganizer is the new smart-browsing technology for Firefox. It automatically recognizes things like books, wine, travel destinations and offers contextual shortcuts between your favorite sites. With BlueOrganizer you can instantly send books to your Amazon Wishlist, find wines with similar taste on Wine.com, lookup maps on Google - all from one simple, personalized menu.
Version 3.3 — June 4, 2007
A clean, easy to use and highly extensible Internet Relay Chat (IRC) client.
Version 0.9.78.1 — April 5, 2007
View a Yahoo! map of a selected address without having to open a new window or tab.
Version 1.1.0 — August 2, 2006
LinkedIn is an online network of more than 10.5 million experienced professionals. LinkedIn helps you be more effective in your daily work and opens doors to opportunities by helping you develop and manage your network of business...
Version 3.0.1 — April 30, 2007
Cooliris Previews gives you the power to browse and share Web links and rich media faster. Just mouse over any link, and the Cooliris preview window immediately appears to show you the content. To email it, just click.
Version 2.3.9 — May 31, 2007
You don't have time to read ALL those Blogs! Let RovR do it for you. Rovr fetches posts from your favorite blogs about whatever you're browsing, showing summaries you can open in-place to read posts right on the page they’re about. Blogrovr also suggests popular items AND lets you Twitter about any site you're on too.
Version 1.1.322 — May 22, 2007
1-Click Answers TM will save you even more time with AnswerTips that instantly deliver the information you are looking for. Just point at any word, hold the Alt key (Ctrl in Linux) and click. Upon letting go, an AnswerTip in the form of a pop-up...
Version 2.2.27 — May 28, 2007
A constantly improving RSS and Atom feed reader. It is fairly powerful, feature rich, well supported and has comprehensive online help.
Version 2.1.9.2 — May 29, 2007
The Pronto Shopping Messenger brings you instant price comparisons when you shop online via a small message window that alerts you of potential savings. With over 63 million products from over 60,000 merchants, Pronto is the most comprehensive...
Version 0.9.8 — October 6, 2006
Allows to choose if you want to view a PDF file inside the browser (as PDF or HTML), if you want to view it outside Firefox with your default or custom PDF reader, or if you want to download it!
Version 0.8.1 — June 2, 2007
Firebug integrates with Firefox to put a wealth of development tools at your fingertips while you browse. You can edit, debug, and monitor CSS, HTML, and JavaScript live in any web page...
Version 1.05 — April 24, 2007
Ever been annoyed by all those ads and banners on the internet that often take longer to download than everything else on the page? Install Adblock Plus now and get rid of them.
Version 0.7.5.1 — May 1, 2007
View and manage downloads from a tidy statusbar - without the download window getting in the way of your web browsing.
Version 0.9.4.7 — June 7, 2007
This extension seamlessly integrates your browser with del.icio.us (http://del.icio.us/), the leading social bookmarking service on the Web.
Version 1.5.29 — April 18, 2007
Adds a menu and a toolbar with various web developer tools.
Version 1.1.4 — June 5, 2007
Get international weather forecasts from AccuWeather.com, and display it in any toolbar or statusbar with this highly customizable and unobtrusive...
Version 0.9.5.2 — February 28, 2007
StumbleUpon lets you "channelsurf" the best-reviewed sites on the web. It is a collaborative surfing tool for finding and sharing great sites. This helps you find interesting webpages you wouldn't think to search for.
Version 3.05 — April 19, 2007
Do you listen to Music while surfing the Web? FoxyTunes lets you control almost any media player and find lyrics, covers, videos, bios and much more with a click right from your browser.
Version 2.9 — April 28, 2007Thursday, 31 May 2012 0
We usually set password for our memory card for privacy and security, but the common mistake every one does at least once in our life time is forgetting password.If you does then the only option is to format your memory card with the help of the card reader and eventually the loss of all your data stored on it. There is a way to break the security wall. If you are a Symbian device lover then no need to worry about the password. You can crack them in few minutes.
In this tutorial I am going to teach you how to reset your memory card password in easy step. Before we start you need to have X-plore (application used to explore your system files and folder even the hidden folders in your device)

Step1: Install X-Plore in your mobile. If you want to download X-Plore search around internet you can download free trail.
Step2: Open your X-plore apps and Press 0(Zero) and check which you have marked the “show the system files”
Step3: Once you done that now go to the following path C:/Sys/Data/Mmcstore
Step4: Once you reached there you need to press “3″ under option to set it in the Hex-viewer
Step5: See the third column you will able to see a line of code ! TMSD02G (c??”?x???6?2?6?2?6). Just check the character between the “?” it is your password ie: 62626
Note: If you have not set the password, then you will not able to gain access to C:/Sys/Data
In this tutorial I am going to teach you how to reset your memory card password in easy step. Before we start you need to have X-plore (application used to explore your system files and folder even the hidden folders in your device)
Step1: Install X-Plore in your mobile. If you want to download X-Plore search around internet you can download free trail.
Step2: Open your X-plore apps and Press 0(Zero) and check which you have marked the “show the system files”
Step3: Once you done that now go to the following path C:/Sys/Data/Mmcstore
Step4: Once you reached there you need to press “3″ under option to set it in the Hex-viewer
Step5: See the third column you will able to see a line of code ! TMSD02G (c??”?x???6?2?6?2?6). Just check the character between the “?” it is your password ie: 62626
Note: If you have not set the password, then you will not able to gain access to C:/Sys/Data
Subscribe to:
Posts (Atom)


